 Thrive Guitar
How to Play the Major Scale on One Guitar String (And Make Music With It)
Learn how to play the major scale on one guitar string, understand whole and half steps, and use slides, legato, and tapping to create melodies.
By Jordan ·

When guitarists start learning scales, they're often introduced to patterns and shapes. Pentatonic boxes, three-note-per-string patterns, CAGED positions, and all kinds of diagrams showing where to put their fingers.
There's nothing wrong with any of these systems. They're incredibly useful, and we'll explore plenty of them.
But there's something much simpler that I think every guitarist should understand, and it's one of my favorite ways to explore the fretboard. Not to mention, it's very beginner-friendly.
The major scale on a single string.
That's it. One string. Seven different notes. And an entire fretboard to explore.
You don't need to memorize five positions or learn a complicated fingering pattern to get started. If you understand the distances between the notes of a major scale, you can build it anywhere on the guitar.
When I was first learning to play guitar, I was always amazed at how my guitar heroes could play something low on the neck, then suddenly dance their way up to the higher frets. I wanted to be able to do that!
And here's where it gets interesting.
You can start creating melodies immediately. You can slide between notes, experiment with hammer-ons and pull-offs, play legato phrases, or simply explore how different notes sound against one another.
You can go full "Eddie" if you want and start tapping your heart out. I mean, who hasn't tried tapping within the first few days of getting their electric guitar?
It's almost as simple as learning the white keys on a piano. It's too simple to ignore.
More importantly, you begin developing a sense of where you're going on the fretboard instead of relying entirely on familiar shapes.
Eventually, when you return to those CAGED or three-note-per-string patterns, you'll have another way of understanding how they connect. You're no longer limited to thinking about the guitar in separate boxes.
The CAGED system is great and all, but every now and then, we need to break out of the CAGED cage!
Learning to play the major scale horizontally is one of the simplest ways to begin developing that freedom to move around the neck.
In this lesson, we're going to build the major scale on one string, learn the interval relationships that make it work, and put it to use making some music.
Understanding the Major Scale Formula
Before we start moving around the fretboard, we need to understand what makes a major scale a major scale.
The good news? It's actually pretty simple.
A major scale is built from a specific sequence of whole steps and half steps. Once you understand that sequence, you can build a major scale starting on any note, on any string.
This is incredibly useful, especially once you understand the formula and get it under your fingers.
First, let's define those two terms.
- Half step (H): The distance of one fret on the guitar. For example, moving from the 3rd fret to the 4th fret.
- Whole step (W): The distance of two frets. For example, moving from the 3rd fret to the 5th fret.
That's all there is to it. One fret or two.
Now, here's the formula for the major scale:
W – W – H – W – W – W – H
In other words:
Whole – Whole – Half – Whole – Whole – Whole – Half
This sequence of intervals is what gives the major scale its familiar sound. It doesn't matter which note you start on. Follow the formula, and you'll produce a major scale.
Let's put it to work.
Building a G Major Scale on One String
We'll start on the low E string, at the 3rd fret. That's a G note, so we'll use it as the starting point, or root, of our scale.
From there, simply follow the formula:
| Note | Fret | Movement |
|---|---|---|
| G | 3 | Starting note |
| A | 5 | Whole step |
| B | 7 | Whole step |
| C | 8 | Half step |
| D | 10 | Whole step |
| E | 12 | Whole step |
| F♯ | 14 | Whole step |
| G | 15 | Half step |
There it is! You've just built a G major scale on a single string.
Notice that we started on G and ended on G, one octave higher. Along the way, we played seven different notes before returning to our starting note at the higher octave.
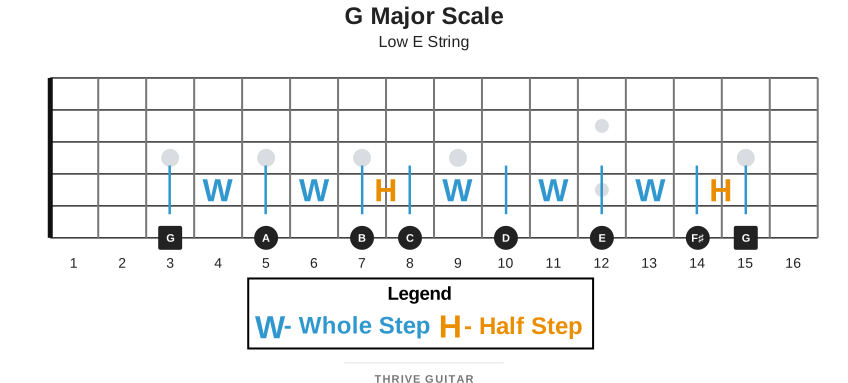
Listen to the scale ascending first, then ascending and descending. Pay attention to the distances between the notes.
G Major Scale — Ascending
G Major Scale — Ascending and Descending
Now try playing it slowly, ascending and descending.
Don't worry about speed, picking technique, or fancy fingerings yet. Just pay attention to the distances between the notes.
Try saying the formula out loud as you move:
Whole, whole, half, whole, whole, whole, half.
Once you can play it comfortably, try starting on a different note and following the same sequence. Just make sure you have enough frets available to complete the scale.
The pattern doesn't change. Only your starting point does.
And that's one of the most useful things about understanding intervals instead of relying entirely on memorized shapes.
Start Making Melodies With the Major Scale
Now that you know how to build a major scale on one string, let's make some music with it.
Remember, a scale isn't just something to practice ascending and descending. It's a collection of notes you can use to create melodies.
Let's stick with our G major scale on the low E string.
Instead of playing all eight notes in order, try this simple phrase:
G – A – B – D – B – A – G
On the low E string, that's:
3 – 5 – 7 – 10 – 7 – 5 – 3
Play it slowly. Then try changing things around.
- Play the notes in a different order.
- Hold some notes longer than others.
- Repeat a few notes to create a rhythmic idea.
- Try sliding between notes instead of picking every one.
Notice how you can create different musical ideas without changing strings or learning another scale pattern. And as a bonus, you've only got one string to worry about tuning!
And here's something worth experimenting with: try ending your phrase on a note other than G. Listen to how that changes the feeling of the melody.
You don't have to understand all the theory behind it yet. Just listen and experiment.
If you've got a backing track or someone playing chords, try playing along. Let your ear be your guide. Pay attention to which notes sound comfortable over the chords and which ones create a little more tension.
Here's a short melodic idea using notes from our G major scale. Listen to how the rhythm and phrasing turn a few familiar notes into something musical.
Listen: A Melody on One String
The goal isn't to memorize this particular phrase. It's to start thinking of the major scale as a source of musical ideas rather than just another fingering exercise.
Once you start improvising, you'll see just how useful this single-string approach can be.
Add Some Expression: Slides, Legato, and Tapping
Now that you're starting to make melodies, let's have a little fun with them.
One of the great things about playing on a single string is how easily you can move between notes using different techniques.
Take our original phrase:
G – A – B – D – B – A – G
Or, on the low E string:
3 – 5 – 7 – 10 – 7 – 5 – 3
Instead of picking every note, try experimenting with a few different approaches.
Slides
Start at the 3rd fret and slide up to the 5th fret without lifting your finger off the string.
You can do the same thing between the 7th and 10th frets.
Slides give your phrases a different character and help you get comfortable moving horizontally along the neck.
By the way, if you have any intentions of playing slide guitar, you can probably start to understand why you need to know this.
Hammer-Ons and Pull-Offs
Here's where we can start connecting notes without picking every one.
Try picking the G at the 3rd fret, then hammering on to the A at the 5th fret.
On the way back down, pick the A and pull off to the G.
These techniques are part of what guitarists commonly call legato playing. They allow you to connect notes smoothly without picking every one.
Tapping
Remember our Eddie Van Halen reference? As Bob Ross says, let's get a little crazy now.
Here's your chance to experiment.
Try playing G and A at the 3rd and 5th frets with your fretting hand, then tapping the D at the 10th fret with a finger from your picking hand.
You can create some interesting phrases with just those three notes.
Don't worry about playing fast. Focus on getting each note to sound clearly.
Here's a separate tapping lick I came up with that utilizes several notes of the major scale. Start with the clean recording to hear the individual notes, then listen to the high-gain version.
Tapping Lick — Clean
Tapping Lick — Distorted
That distorted one is pretty killer if you ask me! I was ablet to write that very quickly, just by using knowledge of the major scale on the single string. Super useful stuff here.
The important thing here isn't mastering every technique. It's discovering how many different sounds you can create using the same small collection of notes.
You're still playing the G major scale. You're just finding new ways to make it sound musical.
Don't Forget About Open Strings!
So far, we've been playing everything with fretted notes. But what about those open strings?
You can use them too!
One particularly fun technique is to alternate an open string with fretted notes from a scale, creating a repeating pedal tone underneath a moving melody.
For example, try this on your open D string:
0 – 2 – 0 – 4 – 0 – 5 – 0 – 7 – 0 – 9 – 0 – 11 – 0 – 12
The open D keeps returning while the fretted notes climb through the D major scale.
Try picking the open string and alternating it with each fretted note. As you get comfortable, experiment with hammer-ons, pull-offs, and tapping.
While learning the opening riff to Mercenaries by Angels & Airwaves, I encountered a similar idea. Here's my example of a repeating open D string combined with a moving melody.
It's a great example of how a simple concept can become the foundation for an interesting riff.
Listen to how the open D returns between the fretted notes, creating a pedal tone beneath the moving melody.
Listen: Open D String Melody
Moving the Major Scale to Other Strings and Keys
Here's where understanding the major scale formula really starts to pay off.
Remember our formula?
W – W – H – W – W – W – H
It works on any string, starting from any note, as long as you have enough frets available.
Let's try something different.
Playing C Major on the B String
Find the C note at the 1st fret of your B string.
Now follow the same whole-step and half-step pattern:
| Note | Fret |
|---|---|
| C | 1 |
| D | 3 |
| E | 5 |
| F | 6 |
| G | 8 |
| A | 10 |
| B | 12 |
| C | 13 |
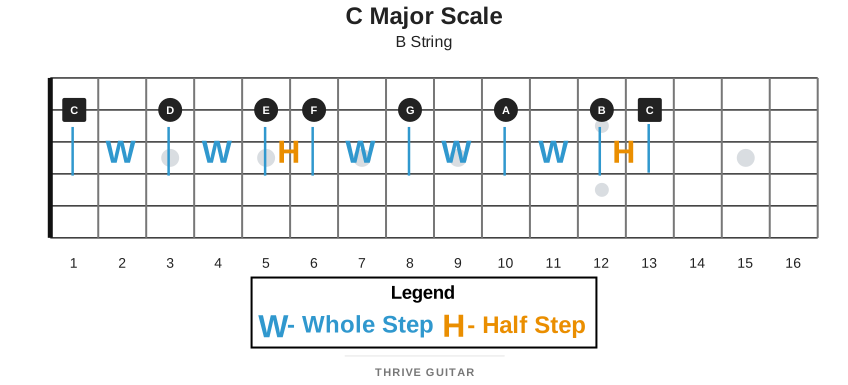
Notice that the fret numbers are different, but the distances between the notes haven't changed.
You're using exactly the same formula we used for G major on the low E string.
Try playing this scale ascending and descending. Then experiment with a few short melodies, just as we did earlier.
Once you're comfortable, try finding another starting note and building a major scale yourself.
You don't need to memorize a new pattern for every key. Understanding the formula gives you a way to figure things out as you go.
And as you become more comfortable moving horizontally, you'll start recognizing how these notes connect to the scale shapes and positions you already know.
Put It Into Practice: A Five-Minute Exercise
Before you move on, spend a few minutes putting everything together.
Here's a simple exercise you can work into your regular guitar practice.
- Build the scale (1 minute). Start with G major on the low E string. Play it ascending and descending, paying attention to the whole-step and half-step intervals.
- Make a melody (2 minutes). Choose three or four notes from the scale and create a short phrase. Experiment with different rhythms and note combinations.
- Add some expression (1 minute). Try incorporating slides, hammer-ons, pull-offs, or tapping into your phrase.
- Change keys (1 minute). Move to C major on the B string, or choose another starting note and build the scale yourself.
That's it. Five minutes.
The goal isn't to play as fast as possible or memorize another pattern. It's to become more comfortable finding notes, moving around the neck, and turning scales into actual music.
If you're putting together a broader practice routine, you might also like our guide on how to build a guitar practice plan.
Where to Go From Here
Learning the major scale on one string is a simple exercise, but the understanding you develop carries over into just about everything else you do on guitar.
As you continue learning CAGED positions, three-note-per-string patterns, arpeggios, and other fretboard systems, try looking for these same interval relationships.
You'll begin seeing how everything connects.
And the next time you watch one of your favorite guitarists dance up and down the neck, you'll have a better understanding of what's happening.
Now go make some music!